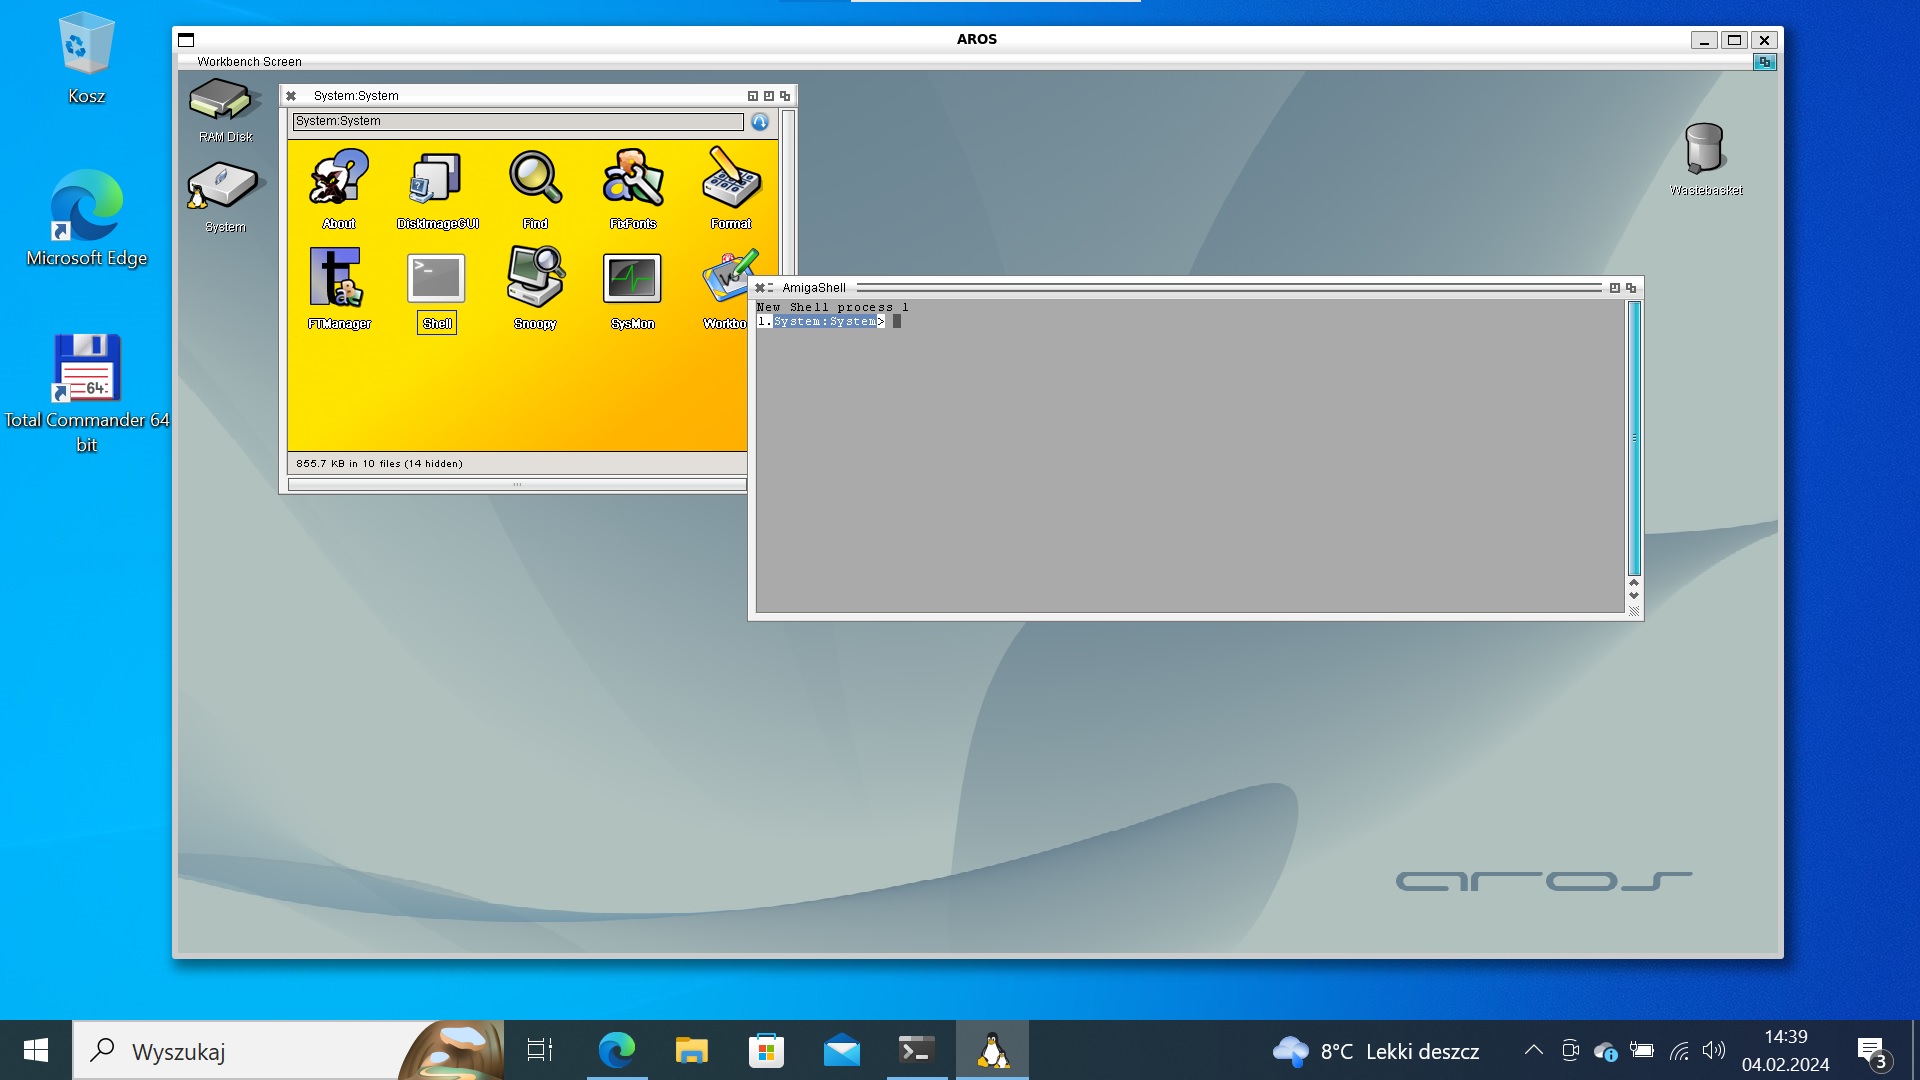
Cross-compiling is the process of developing software on one system that is intended to run on another system. You can compile software for AROS using an AROS port hosted on Linux. Under Windows, this is possible using WSL2 (Windows Subsystem for Linux 2).
Requirements
To install WSL2 you need:
- Windows 10 May 2020 (2004) or newer operating system
- Computer supporting Hyper-V Virtualization
- Installed driver for vGPU
To run GUI applications on Linux, you must first install the driver below that matches your system. This will allow you to use a virtual graphics processor (vGPU), which enables you to use hardware-accelerated OpenGL rendering.
Intel GPU Driver
AMD GPU Driver
NVIDIA GPU Driver
WSL2 installation
Open Command Prompt with administrator privileges and type:
wsl --install -d ubuntu-22.04
After completion, restart the computer. Log in to Windows, and the command prompt will open again. This time you will be guided through the Ubuntu configuration using a username and password (they do not have to be the same as the Windows username and password).
Now you can run the Ubuntu application from the Start menu to get started, or install the Microsoft Terminal application.
To update the packages in your freshly installed Ubuntu, type the command:
sudo apt update && sudo apt upgrade
From the Windows side, you have easy access to the Ubuntu file system by typing in File Explorer \\wsl$\Ubuntu-22.04
Installing AROS WSL2 hosted x86_64
Install all the required packages. You can do this with one command:
sudo apt install git gcc g++ make gawk bison flex bzip2 netpbm autoconf automake libx11-dev libxext-dev libc6-dev liblzo2-dev libxxf86vm-dev libpng-dev gcc-multilib libsdl1.2-dev byacc python3-mako libxcursor-dev cmake genisoimage dh-make unzip nasm gperf
For the purposes of this installation, create a directory myprojects in your user directory in Ubuntu, and in it a directory arosbuilds. Then clone the AROS repository from deadwood’s github and copy the rebuild.sh file from the AROS directory to the arosbuilds directory. Below is a sequence of commands to do this:
mkdir myprojects
cd myprojects
mkdir arosbuilds
cd arosbuilds
git clone https://github.com/deadwood2/AROS.git AROS
cp ./AROS/scripts/rebuild.sh .
Run the rebuild.sh script:
./rebuild.sh
Select toolchain-core-x86_64
1) toolchain-core-x86_64
When finished, run the rebuild.sh script again, this time select core-linux-x86_64 (DEBUG).
2) core-linux-x86_64 (DEBUG)
A network connection is required during compilation, as additional sources are downloaded from the network.
If there is a network problem during downloading, the download will fail. The first option is to repeat the last step of the process and maybe the download will work (if the network problem was temporary). If that doesn’t work, look at the log and you will see the URLs from which the build process tries to download files. Use this URL to download the files manually through the browser, and then place the files in the portssources directory. It may also be necessary to delete some temporary files in the portssources directory with names similar to the downloaded ones (files with the *.fetch extension).
Once the operation is complete, AROS is already installed. You can run it by executing the AROSBootstrap file.
cd core-linux-x86_64-d/bin/linux-x86_64/AROS
./boot/linux/AROSBootstrap
If you want to run AROS with a certain amount of memory use the -m parameter, e.g., “-m 1024” for 1GB RAM
 AROS x86_64 on WSL2
On the Ubuntu side, you can use a script that will configure the network connection for AROS. You can create a startaros.sh script in your home directory that will set up the network and then start AROS with 1GB of RAM:
#!/bin/sh

NETON=`ifconfig | grep aros0`

if [ "$NETON" = "" ]; then
    echo "Installing bridge network... (sudo access required)"
    sudo tunctl -b -u "$USER" -t aros0
    sudo ifconfig aros0 192.168.166.1
    sudo iptables -t nat -A POSTROUTING -o eth0 -s 192.168.166.0/2 -j MASQUERADE
    sudo iptables -t nat -A POSTROUTING -o wlan0 -s 192.168.166.0/2 -j MASQUERADE
    sudo sh -c "echo 1 > /proc/sys/net/ipv4/ip_forward"
fi

cd myprojects/arosbuilds/core-linux-x86_64-d/bin/linux-x86_64/AROS
./boot/linux/AROSBootstrap -m 1024
If your network interface has a name other than eth0, remember to change it in the script.
So that you can execute the script, change the attributes of the created file:
chmod 755 startaros.sh
The above script also requires installing additional packages to work:
sudo apt install net-tools uml-utilities
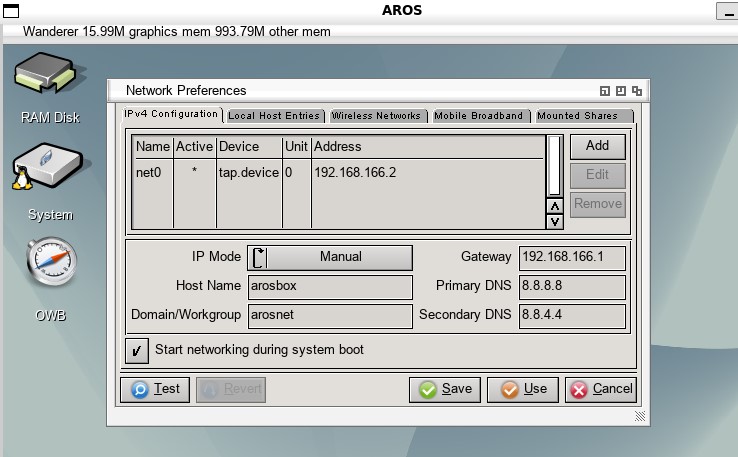
On the AROS side, in Prefs/Network, select the tap.device interface and manually set the IP addresses as in the following screenshot:
 Network configuration in AROS WSL2 hosted
The next step will be to compile the contrib so that you have the entire AROS SDK at your disposal.
git clone https://github.com/deadwood2/contrib.git contrib
cd contrib
git checkout master
Move the downloaded contrib directory to the AROS directory (so that you have AROS/contrib). Then go to the core-linux-x86_64-d directory and run:
make contrib
If you have a multi-core processor, you can use the make command with the -j parameter (e.g. “make -j4 contrib “) to slightly speed up the build process using more threads.
Create the cross-x86_64-aros directory at the same level as the AROS and core-linux-x86_64-d directories.
mkdir cross-x86_64-aros
Then create a file in it named x86_64-aros-gcc with the following content:
exec /home/username/myprojects/arosbuilds/toolchain-core-x86_64/x86_64-aros-gcc --sysroot=/home/username/myprojects/arosbuilds/core-linux-x86_64-d/bin/linux-x86_64/AROS/Development "$@"
And set attributes for it:
chmod 755 x86_64-aros-gcc
The last step will be to add the cross-x86_64-aros directory to the PATH. To do this permanently open the .bashrc file that is in your user home directory and at the very end add the line:
export PATH=$PATH:/home/username/myprojects/arosbuilds/cross-x86_64-aros
Remember to change username in the paths to your username.
If all went well, by typing x86_64-aros-gcc you should have a working compiler.
x86_64-aros-gcc -o hello hello.c
If you want to install the i386 version, you need to modify some commands. Start by updating the required packages:
sudo dpkg --add-architecture i386
sudo apt update && sudo apt upgrade
sudo apt install subversion git-core gcc g++ make gawk bison flex bzip2 netpbm autoconf automake libx11-dev libxext-dev libc6-dev liblzo2-dev libxxf86vm-dev libxxf86vm-dev:i386 libpng-dev gcc-multilib libsdl1.2-dev byacc python3-mako libxcursor-dev libxcursor1:i386 cmake zsh mingw-w64 genisoimage dh-make unzip
Clone the AROS repository from github:
$ mkdir myrepo
$ cd myrepo
$ git clone https://github.com/deadwood2/AROS.git AROS
$ cd AROS
$ git checkout alt-abiv0
$ cd ..
$ cp ./AROS/scripts/rebuild.sh .
Run the rebuild.sh script:
./rebuild.sh
Select the toolchain-alt-abiv0-i386 option.
1) toolchain-alt-abiv0-i386
When finished, run the rebuild.sh script again, this time select the alt-abiv0-linux-i386 (DEBUG) option.
3) alt-abiv0-linux-i386 (DEBUG).
Once the operation is complete, AROS is now installed. You can run it by executing the AROSBootstrap file.
cd alt-abiv0-linux-i386-d/bin/linux-i386/AROS
./Arch/linux/AROSBootstrap
Compile contrib:
git clone https://github.com/deadwood2/contrib.git contrib
cd contrib
git checkout alt-abiv0
Move the downloaded contrib directory to the AROS directory (so that you have AROS/contrib). Then go to the alt-abiv0-linux-i386-d directory and run:
make contrib
Create the cross-i386-aros directory at the same level as the AROS and alt-abiv0-linux-i386-d directories.
mkdir cross-i386-aros
Then create a file named i386-aros-gcc in it with the following contents:
exec /home/username/myrepo/toolchain-alt-abiv0-i386/i386-aros-gcc --sysroot=/home/username/myrepo/alt-abiv0-linux-i386-d/bin/linux-i386/AROS/Development "$@"
And set the attributes to it:
chmod 755 i386-aros-gcc
The last step will be to add the cross-i386-aros directory to the PATH. To do this permanently open the .bashrc file, which is located in your user home directory, and at the very end add the line:
export PATH=$PATH:/home/username/myrepo/cross-i386-aros